|
| |||||||||||
|
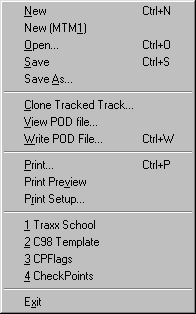
(The File Menu) As is the case with most programs, the Traxx main menu bar is located in the top left-hand corner of the Traxx window. The Traxx main menu bar is comprised of six options. Clicking on the image of each menu item will send you to a page that explains what is on that menu. File Drop Down Menu Left clicking on the File option opens this menu :
New - Clicking on the New option will clear everything from the Traxx working area in order that you may begin working on a mtm2 track from scratch (i.e., from the very beginning). It is unnecessary to use the New option when you first launch Traxx since it defaults to a blank mtm2 working area. Using the New option is safe because it will not discard unsaved changes that you may have made to your track; if changes have been made since the last time you saved your work, you will be prompted to save or discard those changes before the working area will be cleared. New [MTM1] - This option works exactly like the New option except that it clears the working area to begin making a track for use in MTM1.
Open... - Clicking this option will open a standard windows dialog box from which you can retrieve a previously saved track that you have been working on. Traxx saves its working files with a TXX extension and the files are clearly identifiable by the Traxx logo. They look like this in the windows dialog box :
Simply highlight the file you want to continue working on, click <Open> in the windows dialog box, and the file will load everything into Traxx. You may then continue working on your track. Save - Clicking on this option will save your track to a Traxx TXX file so that you can work on it at a later time. It is also extremely wise to use this option during the progress of your work just in case you encounter problems that prevent you from saving later. The first time you use the Save option you will be prompted to give your TXX file a name; all subsequent times the track will save (without a prompt) to the same file name.
Save As... - Clicking on this option will always prompt you to name the TXX file before it is saved. This can be useful for naming an untitled track, for keeping multiple copies of the same track (if paranoia prevents you from sleeping, knowing that all your work is invested in a single, lonely, little file that can easily become corrupted and cost you weeks of endless work trying to re-create what was lost and is probably gone forever anyway), or just for making backups of your track. Clone Tracked Track ... - LOL. I have never used this feature and don't know anybody who has, and there is scant information about it in the Traxx Help files. I can only guess that it is designed for the importation into Traxx tracks that were begun in Tracked or Tracked2 after a track maker realized the error of his/her ways but who did not want to lose all the time, energy and effort expended during their excursion through TRI's darkness. I had thought to ask Guitar Bill about this feature, but I understand that Tracked/2 is a great source of torment and mental anguish to him. And, since The Monster Truck Madness Guild is dedicated to making things easier for track makers, I have decided to let sleeping dogs lie. If somebody is in absolute dire need to know more, and this must be an obsessional life and death need to know, about the Clone Tracked Track ... feature, I suppose we can try to dig up the answers for you. View POD File - This feature is one of the handiest little things that you will use. Clicking this option opens a windows dialog box; use it to navigate to the MTM2 folder, for example: c:\program files\microsoft games\monster truck madness 2. In this folder you will find all the POD files that contain MTM2 tracks (to see of list of tracks and their corresponding pod files, please click here - use your browser's <back> button to return to this page). Highlight the POD you want to have a look at and click <open> in the windows dialog box. This will load the track into Traxx. This process allows you to do at least two things : first, you can examine how existing tracks are put together so that you can get ideas for use in your own tracks, and secondly, it activates the Extract Models and Art feature described below. Note: you CANNOT edit tracks in View POD File.
Write POD File - This feature is the last step in track making. When you are ready to test drive your track, clicking this option will open a dialog box that will allow you to name and save the pod file for your track.
Make sure you save the Pod file to the MTM2 folder, for example: c:\program files\microsoft games\monster truck madness 2
Print, Print Preview & Print Setup... - These options are like printing in any other program. However, I find that they are not practical features to use in Traxx. You may only print whatever is in the working area at the time the print command is used, and it prints to a small square in the upper left-hand corner of a page. You cannot print a detailed diagram of your track's layout (or anything like that). I suspect the print options were included in Traxx for formality's sake only. If you must investigate this option, save a tree and use the <Print Preview> option instead of wasting a page. Numbered options - The numbered options are short cuts to the files you have opened recently in Traxx. In the example above, 1. Traxx School, 2. C98 Template, 3. CPFlags, and 4. CheckPoints were the last four files opened into Traxx and can be accessed again via their short cuts in the list. This is the same as using the Open option but without the need to search for, highlight, and open the file you want. Exit - Close program and end of session. |