|
| ||
|
(Sizing)
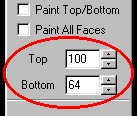
Since a ground box is the exact size of a grid square, the only sizing
you can really do on one is to set the altitude levels for the top and
bottom of the box. To make these adjustments you must, of course,
be in ground box edit mode
And that's basically it, with two noteworthy exceptions. You cannot set a top value that is lower than the bottom value, and vice versa: you cannot set a bottom value that is higher than the top value. As obvious as this might seem at first, it may be the source of some frustration later when you try to adjust the settings. For example, attempting to key in new values may cause Traxx to over-ride your effort by substituting default values. To work around this problem, I find it helpful to set the bottom value to zero, adjust the top level, and then re-set the bottom up to where I want it to be. Ground boxes may extend below the terrain surface, and, for the most part, this is a good thing since you want to make sure that it sits firmly on the ground (not floating in the air). The trouble occurs, however, when the ground box extends too far beneath the surface. When that happens you may get some very disturbing transparency effects where you will be able to see clear through a portion of the ground box and usually down to the backdrop. The solution here is to make sure the ground box does not extend below the terrain anymore than a few feet. Please see here for additional notes about ground boxes. |
