
Traxx can now load PNG and TGA pictures straight into the Textures window, at sizes far beyond the old 64x64 and 256x256 tiles, and pack them into the pod beside the old 8-bit art. We'll walk through loading one, then the extra maps that can ride along with it, then the one choice you make when you write the pod.
Needs: Community Patch #4.
Note: the original game keeps using the 8-bit copy Traxx makes for it, so a track with HD textures still loads and plays there. The one exception is a choice you make on purpose in Step 5.
Make your texture in any paint program and save it as a PNG or a TGA. Traxx checks three things when it loads the file:
Tip: 256 or 512 is plenty for ground. A 2048 texture takes four times the memory of a 1024 one, so keep the big ones for the places the player really looks.
Note: the game does not treat a picture under 128 pixels a side as true colour. It squeezes it into the 8-bit palette, as it always did. Write POD warns about this.
Note: do not name a texture so that it ends in _N or _AO. Traxx reads those endings as the extra maps in Step 3, not as textures.
Open the Textures window with View → Textures, click Load >>, and your art folder's pictures appear in the right-hand list. PNG and TGA files are listed there just like .RAW files. Double-click one, or use Add Page, exactly as on the old Loading page. The Load Texture button on the Textures toolbar opens a file dialog that offers HD sources (*.png;*.tga).
Behind the scenes Traxx also makes the old 8-bit version for you, as a .RAW and .ACT beside your picture in the art folder. The 8-bit copy is 256 pixels square for art of 256 or more, and 64 for anything smaller.
The thumbnails and the editor's own view stay 8-bit, so a 1024 texture looks much like a 64 one on screen. To check what you loaded, click the texture and read the size box beside its name. It shows two numbers, for example:
256 / HD 1024
The first number is the 8-bit copy; the number after HD is your picture. A texture with no HD picture shows just the one number.

Note: if Traxx says "Some OTHER files in this ART folder cannot be used as HD textures", it is naming pictures in the folder that it cannot use — for example ones that are not square powers of two — each with its reason. It has skipped them. The textures you have loaded are fine.
Tip: you can edit a loaded PNG in your paint program. When you write the pod, Traxx brings the 8-bit copy up to date from the picture first, so you never ship an old one.
A normal map gives a texture a bumpy, lit-from-the-side look; an AO (ambient occlusion) map darkens its creases. To use them, save them next to your texture in the art folder, with the texture's name plus an ending:
<name>_N.png for the normal map<name>_AO.png for the AO mapTraxx finds them when it writes the pod and packs each one once, even if many objects share the same texture. The texture they belong to can be a PNG or TGA, or an old .RAW one.
You will not see these files in the Textures window, on purpose. A normal map is not something you paint with, so Traxx keeps it out of your way. If you try to load one by hand Traxx says "Normal map" and tells you to add the main texture instead.
Paste Composite cuts one big picture into a grid of textures. Use the Paste Composite button on the Textures toolbar (or right-click on the left-hand side, where your loaded textures are, and choose it). If a picture is on the clipboard (true colour, or an old 8-bit one), Traxx takes it. Otherwise it asks you for a PNG or TGA file. The Cut Textures from an Image window opens, and you can click Open Image... at any time to choose a different file.
The picture can be up to 8192 pixels a side. In the window you choose:
TERR makes TERR00, TERR10 and so on.The window draws the grid on your picture, and a line below says how many textures it will make. Press OK and the tiles are written into your art folder and loaded into the track.
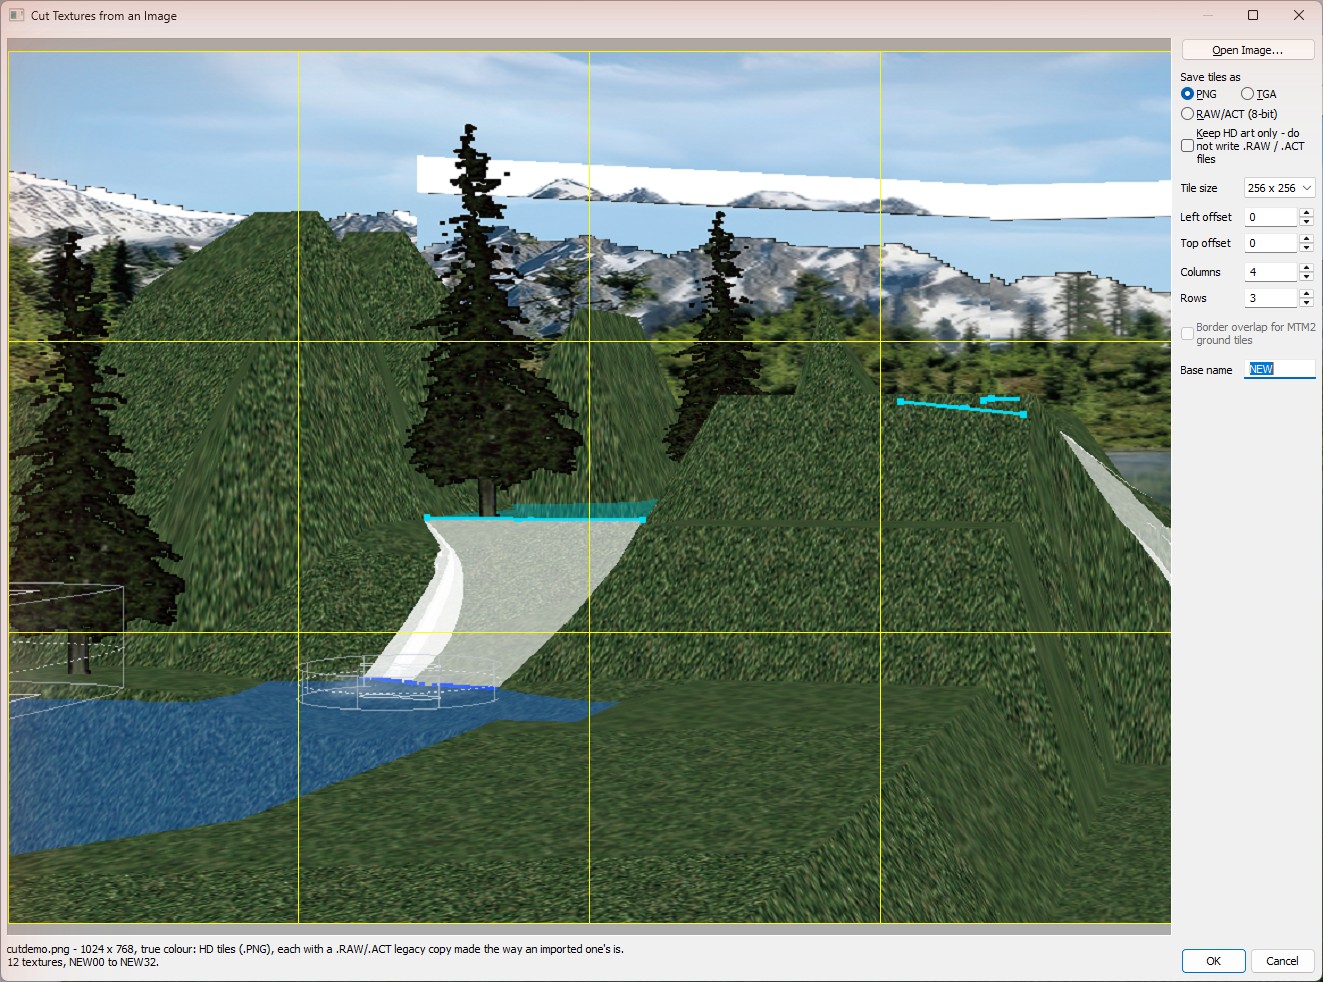
Tip: Border overlap for MTM2 ground tiles only matters for RAW/ACT tiles. PNG and TGA tiles simply sit edge to edge, and Traxx builds the border of each one's 8-bit copy itself.
Note: Paste Composite never overwrites. If a tile name is already a texture in the track, or already a file in the art folder, nothing is written and you are asked for another base name.
When you write the pod with File → Write POD File..., Traxx packs your HD pictures and also the old 8-bit copy of each one. That is the legacy fallback: it lets the original game, which cannot read PNG, show your track.
If your track has HD pictures, Traxx first opens a window called Legacy .RAW fallback. It tells you how many KB of the pod the fallback takes and what dropping it would mean. Press Continue, then name your pod. The Write POD file window has a tickbox:
Omit the legacy .RAW fallback (saves N KB)
Tick it for a smaller pod. The cost is this: the current game is unaffected, and your HD pictures are packed either way, but the original game will not see the track at all. It stays hidden rather than loading with broken textures. If you share the track with people who run the original game, leave the box empty.
Traxx remembers the choice with the track, not as a program setting.
Note: a track on one of the 16-bit terrain grids has the box ticked and greyed out, because the original game cannot read that ground anyway. A track with no PNG or TGA textures has nothing to omit.
Tip: the long explanation window has Don't explain this again. The tickbox itself always stays. To see the explanation again, tick Explain the legacy .RAW fallback when writing a pod in View → Options → Advanced.
There is also a separate setting, Keep HD art only — do not write .RAW / .ACT files (View → Options → Folders, and a matching box in the Cut Textures window). It only stops Traxx filling your art folder with 8-bit copies. Traxx builds them in memory when it needs them. It is off by default, and it does not change what goes in the pod. That is still decided by the box above.

See also: Loading, Custom, Writing the Pod.
| << Checkpoints & Objects << | >> Menu Pictures & Music >> |
