|
| ||||||||||||||||||
|
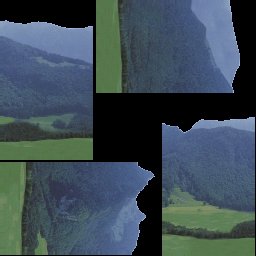
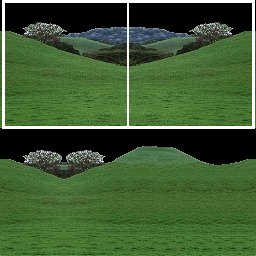
(Textures) Textures are the hardest part about creating a custom backdrop. The trick, it would seem, is to create a graphic that appears to have no sides; or, to be more precise, a graphic where the left and right edges flow into one another as smoothly as if it was a single, continuous whole. This seamlessness is what creates a sort of "surround" effect in the game. No matter where you look, no matter what your truck's vantage point, the backdrop is in sight and looks perfect. To add to this difficulty, all backdrops in the game map the sixteen sides of the backdrop bin to just one 256x256 *.raw file. Let's take a look at a couple of textures so we can see what we're talking about.
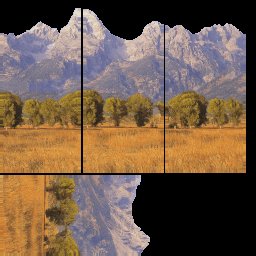
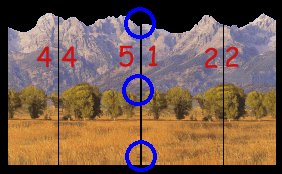
You can see that a much wider picture has been sliced up into four parts and has then been arranged to fit onto the 256x256 texture. The bin is then mapped one face at a time to these parts of the texture.
This four part structure is not coincidental since the sixteen faces of the backdrop bin needs textures that are split into sub-divisions of sixteen (for example, 1, 2, 4, 8, and 16) in order to create the surround effect.
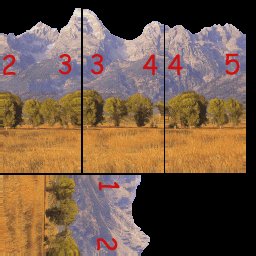
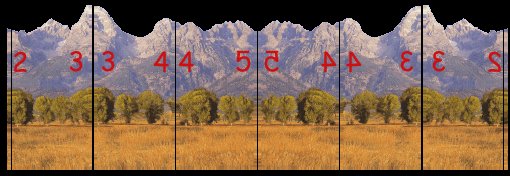
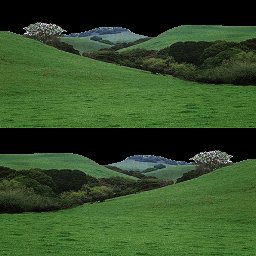
This is not as confusing as it sounds. Looking at how the surround effect is created should help clarify matters. Creating the Surround Effect Using one of the textures above for our example, imagine that the edges are numbered so that we can remember what goes where and how things line up. For example.
Now, when we map the first four bin faces to the texture, the job is pretty straight forward : all we need to do is keep the numbered edges together and keep the numbers in order. Like so:
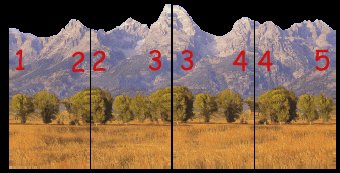
This is beginning to look like something and has been pretty easy so far, but now we want to map the next, the "fifth", face. This presents some posing questions. Do we just start with face number 1 all over again and continue as we have been? Will edge 1 line up with edge 5? Do we create a scene that continues forever, all the way around the backdrop? But what happens when the last edge comes full circle around to the first edge again? Will they line up or not? What if the next part of the texture does not line up with where we left off? What then?
The answers to these questions will depend on your ability to create textures, and how mindful you want to be of the strain you're putting on weaker graphics cards. Let's start by looking at what happens if we continue mapping in a sequence. For example:
The difficulty here is that the starting and finishing edges will seldom line up perfectly. And, again noting the remarkable job Terminal Reality has done in creating their textures, you can see that this backdrop is not without it's blemishes. In the case of this particular example, these flaws will be almost impossible to notice in the game. If you have the know-how and talent to create textures like this, then do it. You will definitely achieve excellent results. But this is not me, and I suspect it's probably not most mtmers either. If you are like me, you will probably want to take advantage of the mirror (Flip Horz) tool in binedit to help eliminate blemishes. Instead of mapping in order as we had begun, we now map in the reverse order and mirror the texture so that we get a much more even transition from one side of the image to the other. For example:
Now, when you get back to the number 1 texture edge, you simply carry on in the chronological order just as we did at the beginning. Continue in this way, first in order then in reverse order, until you have completely mapped the bin. This mirroring technique will compensate for some very rough graphic imprecision. You should be able to create a smooth looking texture and backdrop even if the edges do not line up at all. We now begin to understand why we want to create textures that are divided into sub-divisions of sixteen. Since the bin is comprised of sixteen sides, we need to have an equal or balanced number of seams in order for the last edge to meet up with the first edge again.
Re-mapping strategies Mapping faces of a bin can be frustrating at the best of times. Mapping a backdrop face by face (not in groups) and trying to line up on a texture that is twisted this way and that will probably drive you right over the cliff. Fortunately, you do not have to resort to such extremes. Example 1 Create a four part scene that's spread across two textures (instead of one). Now you can map two faces at once and just square the faces up with the texture. When you have mapped the first four faces, just reverse the order you're working in and come back for the next four. Repeat until the entire bin is complete.
Example 2 If you do not need a high scenery profile (as with tall buildings), you will be able to squeeze a four part scene onto one texture, like this example. If you use two textures, you will now have room for an eight part scene. Like example one, map two faces at once but this time restrict yourself to the upper or lower part of the texture. Once all sections have been mapped, reverse the order and come back to the beginning again.
|