BinEdit · Modern BinEdit
The BinMapper
The old Texture Mapping page walks you through Groups → Map Face Group to Texture. That's the BinMapper. It has grown up a lot.
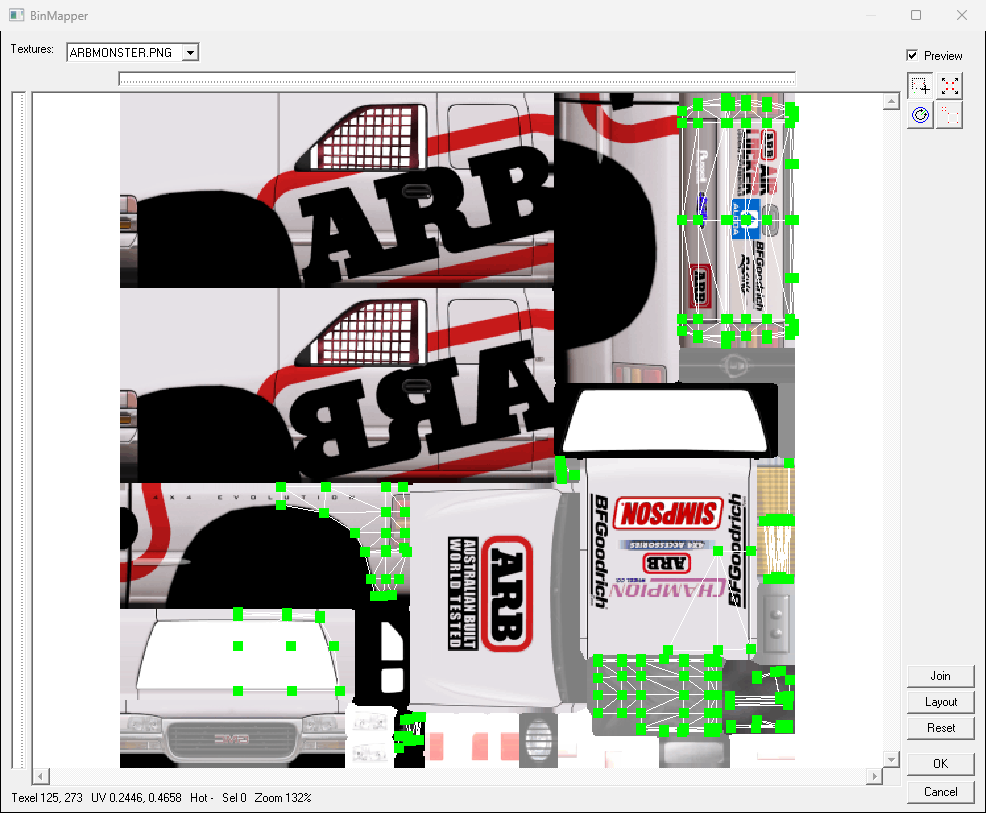
Opening it
Select the faces you want to map, then press T (or use the last toolbar button, or Groups → Map Face Group to Texture). It needs at least one face selected and at least one texture loaded.
It opens on the texture most of those faces already use.
Picking the texture
Pick a texture from the Textures box at the top. Arrowing through the open list previews each texture on the canvas. Only a real choice (a click, or Enter) counts.
Note: A face's texture only changes if you pick one in the box. If the group is a mix of textures and you only drag corners, each face keeps its own texture. To put the whole group on one texture, pick it, even if it's the one already showing. Pressing OK without touching anything changes nothing.
The four modes
| Q | Select | Click a corner or drag a box. Shift adds, Ctrl removes, Alt toggles. Double-click selects all. |
| W | Move | Drag a selected corner to move the selection. Drag an unselected one to move just it. Ctrl+drag moves only that corner. Shift+drag moves everything. Dragging empty space scrolls. |
| E | Rotate | Drag to turn the selection about its centre. Hold Shift for 15° steps. |
| R | Scale | Drag to scale about the selection's centre. Hold Shift to keep proportions. |
Getting around the canvas
- Mouse wheel: zoom in and out around the cursor.
- Middle-drag: pan.
- Right-drag: draw a box to zoom into.
- F or right double-click: fit the texture to the window.
- + / –: zoom.
Keyboard
- Arrow keys nudge the selected corners one texel. Shift+arrows nudge 10.
- Ctrl+A selects all corners.
- Ctrl+Z undoes, Ctrl+Y (or Ctrl+Shift+Z) redoes. Drags, nudges, flips, rotations, Join, Layout and Reset can all be undone. Picking a texture can't.
- Esc cancels a drag. With no drag going, Esc closes the mapper and asks "Discard changes to the mapping?" first (unless you changed nothing). Cancel and the window's X ask too.
The status line
Under the canvas, always:
Texel x, y — UV u, v — Hot x, y — Sel N — Zoom N%
That's where the cursor is (in texture pixels and in 0–1 UV), the corner a click would grab, how many corners are selected, and the zoom (100% = one screen pixel per texel).
The buttons
- Join: wherever faces share a vertex on the model, they now share one point on the texture. This is great for stitching a group back together.
- Layout: throws the mapping away and lays the faces out flat, projected onto the model's two largest axes, filling one copy of the texture. A good place to start on a fresh group.
- Reset: back to how the mapping was when you opened the mapper.
- Preview: tick it to see the mapping on the model in the 3D view as you drag.
The Texture Tools window
A tool window opens beside the mapper, with the tabs Info, Flip/Rotate, Model, Zoom and Guides:
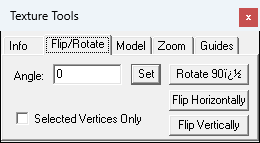
- Flip/Rotate tab: rotate by an angle, Rotate 90°, Flip Horizontally, Flip Vertically. With Selected Vertices Only ticked these act on the selection. Unticked, they act on everything. These are the Rotate / Flip buttons from the old Texture Mapping page.
- Zoom tab: set a scale, zoom in/out/to fit.
- Guides tab: show guides and snap to them.
Double-click a mode button to bring the Tools window back if you closed it.
Remembered for next time
The mapper remembers its size (and whether it was maximised), its mode, its zoom, and the guide and preview settings. Its background colour is set in Preferences → BinMapper. Transparent parts of a PNG show that colour, so your face outlines stay visible.
Tip: While the mapper is open you can still orbit (middle-drag), pan (Shift+middle-drag) and zoom (wheel) the 3D view behind it. Tick Preview, then turn the model to check the far side.

