Some Fun With Transparent Bin Faces
Step one:
Create a simple 64x64 all black (r0,g0,b0) texture, then add some colored pixels to it... something like this...
![]()
... note that that image is 256x256 just to show detail
Step two:
Open your model in BinEdit and select the faces to be transparentized, click on the group menu, then 'set group face type' to 0x33 transparent mtm2, select OK.
With the same group still selected, click on the group menu again, this time select 'map face group to texture'
![]()
Move all the vertice points into a corner....
![]()
Until they are all piled on top of one another forming a one pixel area...
![]()
Move the group next to a colored pixel... the example below will create a faint blue tint since only one side of the vertice group will tap some blue hue.
![]()
Or for a medium tint, map the group to a area that will cover two sides of the vertice group, example below
![]()
For a dark tint, simply map the vertice group to a area that will cover all four sides... example below
![]()
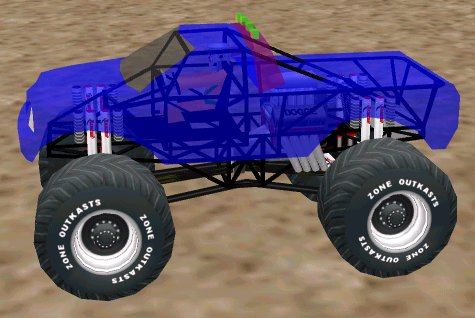
The truck at the top of the page was mapped in the same way except that it was mapped to several different colors... like this...
![]()
some notes, tips...
I used the fibergalssed bigfoot body by LordCap for my sample but removed the underside faces since they produced a undesireable shadow effect.
all transparent faces must be added to your bin last otherwise mtm2 will render them first making everything underneath them invisible as well.
insert transparent bins inside one another to create darker tints and different effects.
my sample above used a truck body but there are a multitude of other possibilities for track prop creations as well.. have fun with it.
[ Main ] [ Tracks ] [ Track Shots ] [ Traxx ] [ M-350 ] [ Scraps ] [ T-N-T ]