Creating Seamless, Animated Track Textures
Page 1

| Tools needed: |
| Traxx 1.4 |
| Paint Shop Pro v4.0 or higher |
Thanks goes out to SLO_HotShoe for the texture samples used here
|
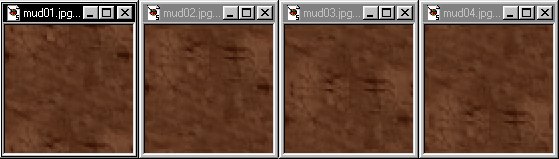
Just like static textures, animated textures need to be made seamless so they appear natural in the game by blending undetectable into one another on all four sides when laid out on the track. For the sake of simplicity, this tutorial deals with an animation made up of just four frames, shown below. If you look closely you can see that each is slightly different so that when they are alternated 1-2-3-4-1-2-3-4... we get the effect as seen at the top of this page (expanded view here). |
|
 |
|
|
Step 1 To create the four frames above,
copy Select the crop tool |
|
| Next we need to swap the top and bottom borders of the three new 64x60 tiles so that they are seamless when applied to the track, this is assuming that your primary tile is seamless on all four sides so we can leave the left and right borders as is. If your primary tile does not tile seamlessly on all four sides then skip the next step and refer to this page instead before continuing on page 2 here. |
| *NOTES*. |
|
There are two very important factors to making a successful animated terrain for mtm2. First, is that one of the frames must already tile with the rest of the tracks non animated textures where (in this case mud01) it seamlessly transitions to other texture types such as grass, dirt, asphalt etc. Here is a traxx view example. This factor will come into play later on in this tutorial when we create animated tiles that blend with non animated tiles. Another important aspect is that each of the four animation frames must tile seamlessly with themselves, they do not need to tile with one another however since they are never seen at the same time, mixed that is. Check to insure that each will tile properly by laying out 9 tiles side by side forming a 3x3 square then viewing them in the game. You should not see hard lines between the tiles in the game, if you do then refer to this page to create seamless tiles, it's easy to do but must be done correctly and better to take care of it now before progessing any further. Once you've accomplished those steps described above, apply the frames to your track and check the animation in the game to be sure everything looks the way you want it to before advancing to Part 2. |
[ Main ] [ Tracks ] [ Track Shots ] [ Traxx ] [ M-350 ] [ Scraps ] [ T-N-T ]