Truck Editing with BinEdit v2.2
Download BinEdit v2.2 and BinEdit support files (dll's) here.
By following the instructions below BinEdit v2.2 will create all the nessesary Art, Model, Sound and Truck folders to get you started as well as insert all preliminary .trk file data, and extract all dependant files. Highly recommended for beginners.
Note: Repainting any part of the truck or tires is done within the main BinEdit interface window (Texture Replacer) as are any direct model modifications, the truck editors purpose is to arrange and build a working .trk and .pod file only. Click on images to enlarge.
==================================================================
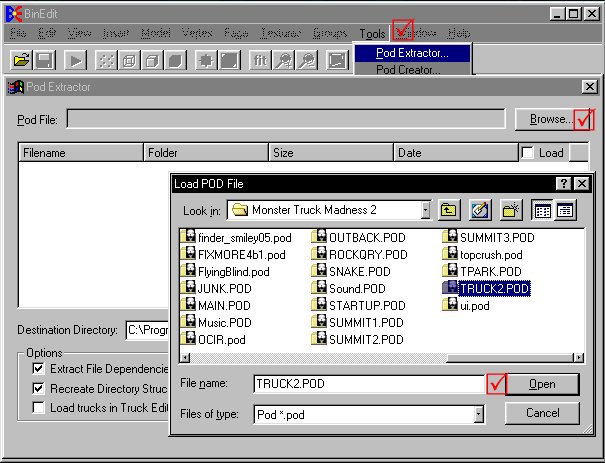
1) Go to the 'Tools' menu and select 'Pod Extractor'. Hit the 'Browse' button and navigate to your Truck2.pod. The default location is C:\Program Files\Microsoft Games\Monster Truck Madness 2. Select the Truck2.pod and hit 'Open'.
==================================================================
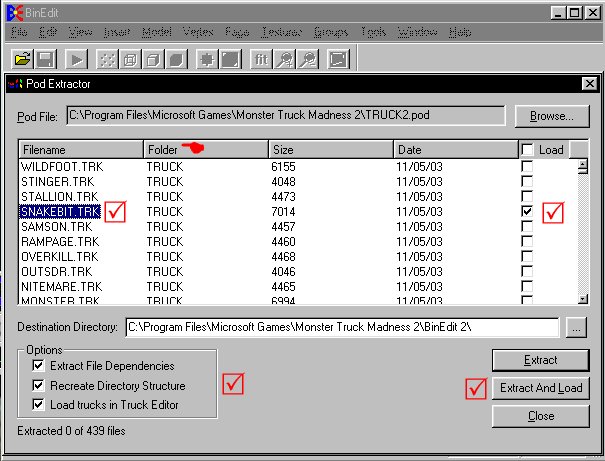
2) Click the Pod Extractor 'Folder' column header twice to arrange the files by type and bring the needed '.Trk' (truck) files to the top of the list. From the list, select (highlight) the .trk file of choice and check the adjacent 'Load' box. Check to be sure all the 'Option' boxes are check marked, then hit the 'Extract and Load' button.
==================================================================
3) The Truck Editor consists of two windows, the Primary window...
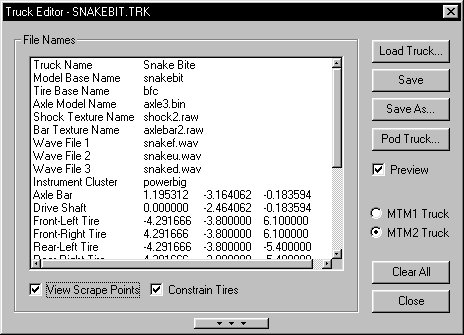
... and the Preview window.

The Primary window displays all the values contained in the .trk file. Changing any of the trk values except light cone data will be reflected real time within the Preview window.
| File Names | Description\Function\Notes |
| Truck Name | Truck name as it will be displayed in the game \ changes truck name text |
| Double click on the name and type in your name of choice (29 characters long, max.). | |
| Model Base Name | Truck body assembly .bin file name \ changes truck body .bin file(s). |
| Highlight the file name and type in the replacement or use the browse button [...] to select a new .bin file from your Model folder. | |
| Tire Base Name | Truck Tire .bin file name \ changes tire bin files used. |
| Highlight the file name and type in the replacement name or use the browse button [...] to select a new .bin file tire set from your Model folder. *MTM2 requires a "set" of tires, described here. | |
| Axle Model Name | Axle .bin file name \ changes axle bin file used. |
| Highlight the file name and type in a replacement name or use the browse button [...] to select a new axle.bin file from your Model folder. | |
| Shock Texture Name | Shock texture name \ changes texture (raw) used on the shock pistons. |
| Highlight the file name and type in a replacement name or use the browse button [...] to select a new .raw file from your Art folder. | |
| Bar Texture Name | Axle Bar texture name \ changes texture (raw) used on the axle bars. |
| Highlight the file name and type in a replacement name or use the browse button [...] to select a new .raw file from your Art folder. | |
| Wave File 1 | wav file name 1 \ in game audio of truck name |
| Highlight the file name and type in a replacement name or use the browse button [...] to select a new .raw file from your Sound folder. | |
| Wave File 2 | wav file name 2 \ in game audio of truck name |
| Highlight the file name and type in a replacement name or use the browse button [...] to select a new .raw file from your Sound folder. | |
| Wave File 3 | wav file name 3 \ in game audio of truck name |
| Highlight the file name and type in a replacement name or use the browse button [...] to select a new .raw file from your Sound folder. | |
| Instrument Cluster | This is only editable by replacing the powerbig file within the Cockpit.pod. More info here. |
| Axle Bar | Position of axle bar centers (where they meet) \ axle ends are fixed, location is non editable. |
| Adjust the data boxes accordingly. ~ 1[X = in-out]~ 2[Y= up-down]~ 3[Z = forward-backward] | |
| Drive Shaft | Position of drive shaft at center (where they meet) \ axle end locations are non editable. |
| Adjust the data boxes accordingly. ~ 1[X = non-editable]~ 2[Y= up-down]~ 3[Z = forward-backward] | |
| Front-Left Tire | Position of front left tire \ changes tire position and truck handling |
| Adjust the data boxes accordingly. ~ 1[X = left-right]~ 2[Y= up-down]~ 3[Z = forward-backward] | |
| Front-Right Tire | Position of front right tire \ changes tire position and truck handling |
| Adjust the data boxes accordingly. ~ 1[X = left-right]~ 2[Y= up-down]~ 3[Z = forward-backward] | |
| Rear-Left Tire | Position of rear left tire \ changes tire position and truck handling |
| Adjust the data boxes accordingly. ~ 1[X = left-right]~ 2[Y= up-down]~ 3[Z = forward-backward] | |
| Rear-Right Tire | Position of rear right tire \ changes tire position and truck handling |
| Adjust the data boxes accordingly. ~ 1[X = left-right]~ 2[Y= up-down]~ 3[Z = forward-backward] |
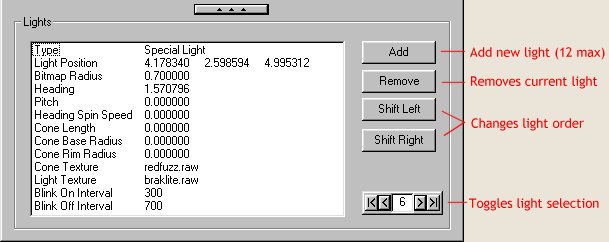
| Lights |
| Type | Designates what type of light used. |
| Click light name for drop down menu of 5 light type variables. | |
| Light Position | Adjusts the X - Y - Z coordinates of selected light. |
| Bitmap Radius | Increases, decreases light texture (raw) size rendering. |
| Heading | Rotates light Y position/direction. |
| 0.0 = forward, 1.6 = right, 3.0 = backward, 4.7 = left... etc. | |
| Pitch | Tilts light direction up and down. |
| Positive numbers adjust direction upward, negative numbers adjust direction downward. | |
| Heading Spin Speed | Sets light to rotate. (ie - Monster Patrol) |
| Positive number rotates clockwise, negative (-) number direction is reversed. Higher number = faster spin. | |
| Cone Length | Increases and decreases light beam (cone) length. |
| Cone Base Radius | Increases and decreases light beam (cone) diameter at the light source. |
| Cone Rim Radius | Increases and decreases light beam (cone) diameter at the end. |
| Cone Texture | Designates cone texture (raw) file to be used. |
| Light Texture | Designates light texture (raw) file to be used. |
| Blink On Interval | Used to make lights blink. Enter 'on' time here. Timer is in milliseconds (ie - Snakebite) |
| Blink Off Interval | Used to make lights blink. Enter 'off' time here. Timer is in milliseconds (ie - Snakebite) |
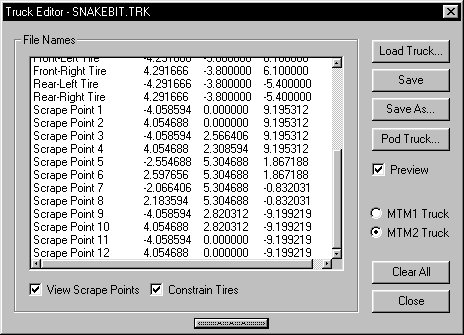
| Scrape points |
| There are 12 scrape points that define the outermost points of the truck body model for in game collision and damage purposes. Selected scrape point will be highlighted in red in the preview window. Note: Tire scrape points are set automatically within the game. |
|
Adjust the data boxes accordingly per your body configuration . ~1[X = left-right]~ 2[Y = up-down]~ 3[Z = forward-backward] |
==============================================================
| The X (left and right) Axis is red |
| The Y (up and down) Axis is green |
| The Z (forward and backward) Axis is blue |
For a complete printable list and diagram of all BinEdit 2.2's options, see the Help menu within the program.
If you have any questions please visit the BinEdit forum here... http://forum.mtm2.com
[ Main ] [ Tracks ] [ Track Shots ] [ Traxx ] [ M-350 ] [ Scraps ] [ T-N-T ]